Disney Kreuzstich: Unterschied zwischen den Versionen
DavidB (Diskussion | Beiträge) Keine Bearbeitungszusammenfassung |
McDuck (Diskussion | Beiträge) KKeine Bearbeitungszusammenfassung |
||
| (Eine dazwischenliegende Version von einem anderen Benutzer wird nicht angezeigt) | |||
| Zeile 2: | Zeile 2: | ||
Die 115-teilige Magazin-Reihe '''Disney Kreuzstich''' erscheint seit Januar 2022 bei [[Hachette]]. Die erste Ausgabe wurde für einen Euro, die zweite für 3,50 Euro und alle folgenden für 5,99 Euro verkauft. Jede Ausgabe ist 16 Seiten dick, misst 285 x 220 mm und wird mit dem zu den Motiven passenden Stickgarn verkauft. Ab der dritten Ausgabe erscheint die Reihe wöchentlich. | Die 115-teilige Magazin-Reihe '''Disney Kreuzstich''' erscheint seit Januar 2022 bei [[Hachette]]. Die erste Ausgabe wurde für einen Euro, die zweite für 3,50 Euro und alle folgenden für 5,99 Euro verkauft. Jede Ausgabe ist 16 Seiten dick, misst 285 x 220 mm und wird mit dem zu den Motiven passenden Stickgarn verkauft. Ab der dritten Ausgabe erscheint die Reihe wöchentlich. | ||
Der Slogan der Reihe, welcher auf jeder Ausgabe zu lesen ist, lautet | Der Slogan der Reihe, welcher auf jeder Ausgabe zu lesen ist, lautet „Disneys zauberhafte Helden in Kreuzstich-Bildern“. | ||
Zusätzlich zu den normalen Motiven gibt es alle zwei Ausgaben ein Stickmotiv, welches zusammen mit den folgenden Ausgaben ein großes, gemeinsames Motiv ergibt. In den ersten beiden Augaben war das zum Beispiel [[Tigger]], bei Ausgabe drei und vier ist es der Elefant [[Dumbo (Figur)|Dumbo]]. | Zusätzlich zu den normalen Motiven gibt es alle zwei Ausgaben ein Stickmotiv, welches zusammen mit den folgenden Ausgaben ein großes, gemeinsames Motiv ergibt. In den ersten beiden Augaben war das zum Beispiel [[Tigger]], bei Ausgabe drei und vier ist es der Elefant [[Dumbo (Figur)|Dumbo]]. | ||
| Zeile 174: | Zeile 174: | ||
| 079 || 19.07.2023 || [[Bild:DKS079.jpg|x150px]] || [[Bild:DCS079.jpg|x150px]] || Nala und Simba (Sammel-Motiv 4) | | 079 || 19.07.2023 || [[Bild:DKS079.jpg|x150px]] || [[Bild:DCS079.jpg|x150px]] || Nala und Simba (Sammel-Motiv 4) | ||
|- | |- | ||
| 080 || | |||
| 080 || 26.07.2023 || [[Bild:DKS080.jpg|x150px]] || [[Bild:DCS080.jpg|x150px]] || Nala und Simba (Sammel-Motiv 4) | |||
|- | |||
| 081 || 02.08.2023 || [[Bild:DKS081.jpg|x150px]] || [[Bild:DCS081.jpg|x150px]] || Nala und Simba (Sammel-Motiv 4) | |||
|- | |||
| 082 || 09.08.2023 || [[Bild:DKS082.jpg|x150px]] || [[Bild:DCS082.jpg|x150px]] || Peter Pan (Sammel-Motiv 4) | |||
|- | |||
| 083 || 16.08.2023 || [[Bild:DKS083.jpg|x150px]] || [[Bild:DCS083.jpg|x150px]] || Peter Pan (Sammel-Motiv 4) | |||
|- | |||
| 084 || 23.08.2023 || [[Bild:DKS084.jpg|x150px]] || [[Bild:DCS084.jpg|x150px]] || Tinkerbell (Sammel-Motiv 4) | |||
|- | |||
| 085 || 30.08.2023 || [[Bild:DKS085.jpg|x150px]] || [[Bild:DCS085.jpg|x150px]] || Tinkerbell (Sammel-Motiv 4) | |||
|- | |||
| 086 || 06.09.2023 || [[Bild:DKS086.jpg|x150px]] || [[Bild:DCS086.jpg|x150px]] || Tinkerbell (Sammel-Motiv 4) | |||
|- | |||
| 087 || 13.09.2023 || [[Bild:DKS087.jpg|x150px]] || [[Bild:DCS087.jpg|x150px]] || Rahmen (Sammel-Motiv 5) | |||
|- | |||
| 088 || 20.09.2023 || [[Bild:DKS088.jpg|x150px]] || [[Bild:DCS088.jpg|x150px]] || Rahmen (Sammel-Motiv 4) | |||
|- | |||
| 089 || 27.09.2023 || [[Bild:DKS089.jpg|x150px]] || [[Bild:DCS089.jpg|x150px]] || Rahmen (Sammel-Motiv 4) | |||
|- | |||
| 090 || 04.10.2023 || [[Bild:DKS090.jpg|x150px]] || [[Bild:DCS090.jpg|x150px]] || Rahmen (Sammel-Motiv 4) | |||
|- | |||
| 091 || 11.10.2023 || [[Bild:DKS091.jpg|x150px]] || [[Bild:DCS091.jpg|x150px]] || Eiskönigin-Quartett (Sammel-Motiv 5) | |||
|- | |||
| 092 || 18.10.2023 || [[Bild:DKS092.jpg|x150px]] || [[Bild:DCS092.jpg|x150px]] || Eiskönigin-Quartett (Sammel-Motiv 5) | |||
|- | |||
| 093 || 25.10.2023 || [[Bild:DKS093.jpg|x150px]] || [[Bild:DCS093.jpg|x150px]] || Eiskönigin-Quartett (Sammel-Motiv 5) | |||
|- | |||
| 094 || 01.11.2023 || [[Bild:DKS094.jpg|x150px]] || [[Bild:DCS094.webp|x150px]] || Elsa (Sammel-Motiv 5) | |||
|- | |||
| 095 || 08.11.2023 || [[Bild:DKS095.jpg|x150px]] || [[Bild:DCS095.webp|x150px]] || Elsa (Sammel-Motiv 5) | |||
|- | |||
| 096 || 15.11.2023 || [[Bild:DKS096.jpg|x150px]] || [[Bild:DCS096.webp|x150px]] || Elsa (Sammel-Motiv 5) | |||
|- | |||
| 097 || 22.11.2023 || [[Bild:DKS097.jpg|x150px]] || [[Bild:DCS097.webp|x150px]] || Olaf (Sammel-Motiv 5) | |||
|- | |||
| 098 || 29.11.2023 || [[Bild:DKS098.jpg|x150px]] || [[Bild:DCS098.webp|x150px]] || Olaf (Sammel-Motiv 5) | |||
|- | |||
| 099 || 06.12.2023 || [[Bild:DKS099.jpg|x150px]] || [[Bild:DCS099.webp|x150px]] || Arendelle (Sammel-Motiv 5) | |||
|- | |||
| 100 || 13.12.2023 || [[Bild:DKS100.jpg|x150px]] || [[Bild:DCS100.webp|x150px]] || Arendelle (Sammel-Motiv 5) | |||
|- | |||
| 101 || 20.12.2023 || [[Bild:DKS101.jpg|x150px]] || [[Bild:DCS101.webp|x150px]] || Troll (Sammel-Motiv 5) | |||
|- | |||
| 102 || 27.12.2023 || [[Bild:DKS102.jpg|x150px]] || [[Bild:DCS102.webp|x150px]] || Troll (Sammel-Motiv 5) | |||
|- | |||
| 103 || 03.01.2024 || [[Bild:DKS103.jpg|x150px]] || [[Bild:DCS103.webp|x150px]] || Anna (Sammel-Motiv 5) | |||
|- | |||
| 104 || 10.01.2024 || [[Bild:DKS104.jpg|x150px]] || [[Bild:DCS104.webp|x150px]] || Anna (Sammel-Motiv 5) | |||
|- | |||
| 105 || 17.01.2024 || [[Bild:DKS105.jpg|x150px]] || [[Bild:DCS105.webp|x150px]] || Anna (Sammel-Motiv 5) | |||
|- | |||
| 106 || 24.01.2024 || [[Bild:DKS106.jpg|x150px]] || [[Bild:DCS106.webp|x150px]] || Christoph und Sven (Sammel-Motiv 5) | |||
|- | |||
| 107 || 31.01.2024 || [[Bild:DKS107.jpg|x150px]] || [[Bild:DCS107.webp|x150px]] || Christoph und Sven (Sammel-Motiv 5) | |||
|- | |||
| 108 || 07.02.2024 || [[Bild:DKS108.jpg|x150px]] || [[Bild:DCS108.webp|x150px]] || Christoph und Sven (Sammel-Motiv 5) | |||
|- | |||
| 109 || 14.02.2024 || [[Bild:DKS109.jpg|x150px]] || [[Bild:DCS109.webp|x150px]] || Bruni (Sammel-Motiv 5) | |||
|- | |||
| 110 || 21.02.2024 || [[Bild:DKS110.jpg|x150px]] || [[Bild:DCS110.webp|x150px]] || Bruni (Sammel-Motiv 5) | |||
|- | |||
| 111 || 28.02.2024 || [[Bild:DKS111.jpg|x150px]] || [[Bild:DCS111.webp|x150px]] || Rahmen (Sammel-Motiv 6) | |||
|- | |||
| 112 || 06.03.2024 || [[Bild:DKS112.jpg|x150px]] || [[Bild:DCS112.webp|x150px]] || Leutnant Destin Mattias (Sammel-Motiv 5) | |||
|- | |||
| 113 || 13.03.2024 || [[Bild:DKS113.jpg|x150px]] || [[Bild:DCS113.webp|x150px]] || Rahmen (Sammel-Motiv 5) | |||
|- | |||
| 114 || 20.03.2024 || [[Bild:DKS114.jpg|x150px]] || [[Bild:DCS114.webp|x150px]] || Rahmen (Sammel-Motiv 5) | |||
|- | |||
| 115 || 27.03.2024 || [[Bild:DKS115.jpg|x150px]] || [[Bild:DCS115.webp|x150px]] || Rahmen (Sammel-Motiv 5) | |||
|- | |||
| 116 || 03.04.2024 || [[Bild:DKS116.jpg|x150px]] || [[Bild:DCS116.webp|x150px]] || Winnie-Puuh-Quartett (Sammel-Motiv 6) | |||
|- | |||
| 117 || 10.04.2024 || [[Bild:DKS117.jpg|x150px]] || [[Bild:DCS117.webp|x150px]] || Winnie-Puuh-Quartett (Sammel-Motiv 6) | |||
|- | |||
| 118 || 17.04.2024 || [[Bild:DKS118.jpg|x150px]] || [[Bild:DCS118.webp|x150px]] || Winnie-Puuh-Quartett (Sammel-Motiv 6) | |||
|- | |||
| 119 || 24.04.2024 || [[Bild:DKS119.jpg|x150px]] || [[Bild:DCS119.webp|x150px]] || Tigger (Sammel-Motiv 6) | |||
|- | |||
| 120 || 01.05.2024 || [[Bild:DKS120.jpg|x150px]] || [[Bild:DCS120.webp|x150px]] || Tigger (Sammel-Motiv 6) | |||
|- | |||
| 121 || 08.05.2024 || [[Bild:DKS121.jpg|x150px]] || [[Bild:DCS121.webp|x150px]] || Ru (Sammel-Motiv 6) | |||
|- | |- | ||
| | | 122 || 15.05.2024 || [[Bild:DKS122.jpg|x150px]] || [[Bild:DCS122.webp|x150px]] || Ru (Sammel-Motiv 6) | ||
|- | |- | ||
| | | 123 || 22.05.2024 || [[Bild:DKS123.jpg|x150px]] || [[Bild:DCS123.webp|x150px]] || I-Aah und Winnie Puuh (Sammel-Motiv 6) | ||
|- | |- | ||
| | | 124 || 29.05.2024 || [[Bild:DKS124.jpg|x150px]] || [[Bild:DCS124.webp|x150px]] || I-Aah und Winnie Puuh (Sammel-Motiv 6) | ||
|- | |- | ||
| | | 125 || 05.06.2024 || [[Bild:DKS125.jpg|x150px]] || [[Bild:DCS125.webp|x150px]] || I-Aah und Winnie Puuh (Sammel-Motiv 6) | ||
|- | |- | ||
| | | 126 || 12.06.2024 || [[Bild:DKS126.jpg|x150px]] || [[Bild:DCS126.webp|x150px]] || I-Aah und Winnie Puuh (Sammel-Motiv 6) | ||
|- | |- | ||
| | | 127 || 19.06.2024 || [[Bild:DKS127.jpg|x150px]] || [[Bild:DCS127.webp|x150px]] || Eule (Sammel-Motiv 6) | ||
|- | |- | ||
| | | 128 || 26.06.2024 || [[Bild:BildfehltDisney.jpg|x150px]] || [[Bild:DCS128.webp|x150px]] || Eule (Sammel-Motiv 6) | ||
|- | |- | ||
| | | 129 || 03.07.2024 || [[Bild:DKS129.jpg|x150px]] || [[Bild:DCS129.webp|x150px]] || Rabbit (Sammel-Motiv 6) | ||
|- | |- | ||
| | | 130 || 10.07.2024 || [[Bild:DKS130.jpg|x150px]] || [[Bild:DCS130.webp|x150px]] || Rabbit (Sammel-Motiv 6) | ||
|- | |- | ||
| | | 131 || 17.07.2024 || [[Bild:DKS131.jpg|x150px]] || [[Bild:DCS131.webp|x150px]] || Rabbit (Sammel-Motiv 6) | ||
|- | |- | ||
| | | 132 || tba || tba || [[Bild:DCS132.webp|x150px]] || I-Aah (Sammel-Motiv 6) | ||
|- | |- | ||
| | | 133 || tba || tba || [[Bild:DCS133.webp|x150px]] || I-Aah (Sammel-Motiv 6) | ||
|- | |- | ||
| | | 134 || tba || tba || [[Bild:DCS134.webp|x150px]] || Ferkel (Sammel-Motiv 6) | ||
|- | |- | ||
| | | 135 || tba || tba || [[Bild:DCS135.webp|x150px]] || Ferkel (Sammel-Motiv 6) | ||
|- | |- | ||
| | | 136 || tba || tba || [[Bild:DCS136.webp|x150px]] || Winnie Puuh (Sammel-Motiv 6) | ||
|- | |- | ||
| | | 137 || tba || tba || [[Bild:DCS137.webp|x150px]] || Rahmen (Sammel-Motiv 7) | ||
|- | |- | ||
| | | 138 || tba || tba || [[Bild:DCS138.webp|x150px]] || Rahmen (Sammel-Motiv 6) | ||
|- | |- | ||
| | | 139 || tba || tba || [[Bild:DCS139.webp|x150px]] || Rahmen (Sammel-Motiv 6) | ||
|- | |- | ||
| | | 140 || tba || tba || [[Bild:DCS140.webp|x150px]] || Rahmen (Sammel-Motiv 6) | ||
|- | |- | ||
| | | 141 || tba || tba || [[Bild:DCS141.webp|x150px]] || Villains-Trio (Sammel-Motiv 7) | ||
|- | |- | ||
| | | 142 || tba || tba || [[Bild:DCS142.webp|x150px]] || Villains-Trio (Sammel-Motiv 7) | ||
|- | |- | ||
| | | 143 || tba || tba || [[Bild:DCS143.webp|x150px]] || Villains-Trio (Sammel-Motiv 7) | ||
|- | |- | ||
| | | 144 || tba || tba || [[Bild:DCS144.webp|x150px]] || Herzkönigin (Sammel-Motiv 7) | ||
|- | |- | ||
| | | 145 || tba || tba || [[Bild:DCS145.webp|x150px]] || Herzkönigin (Sammel-Motiv 7) | ||
|- | |- | ||
| | | 146 || tba || tba || [[Bild:DCS146.webp|x150px]] || Malefiz (Sammel-Motiv 7) | ||
|- | |- | ||
| | | 147 || tba || tba || [[Bild:DCS147.webp|x150px]] || Malefiz (Sammel-Motiv 7) | ||
|- | |- | ||
| | | 148 || tba || tba || [[Bild:DCS148.webp|x150px]] || Käpt'n Hook (Sammel-Motiv 7) | ||
|- | |- | ||
| | | 149 || tba || tba || [[Bild:DCS149.webp|x150px]] || Käpt'n Hook (Sammel-Motiv 7) | ||
|- | |- | ||
| | | 150 || tba || tba || [[Bild:DCS150.webp|x150px]] || Käpt'n Hook (Sammel-Motiv 7) | ||
|- | |- | ||
| | | 151 || tba || tba || [[Bild:DCS151.webp|x150px]] || Käpt'n Hook (Sammel-Motiv 7) | ||
|- | |- | ||
| | | 152 || tba || tba || [[Bild:DCS152.webp|x150px]] || Dschafar (Sammel-Motiv 7) | ||
|- | |- | ||
| | | 153 || tba || tba || [[Bild:DCS153.webp|x150px]] || Dschafar (Sammel-Motiv 7) | ||
|- | |- | ||
| | | 154 || tba || tba || [[Bild:DCS154.webp|x150px]] || Shir Khan (Sammel-Motiv 7) | ||
|- | |- | ||
| | | 155 || tba || tba || [[Bild:DCS155.webp|x150px]] || Shir Khan (Sammel-Motiv 7) | ||
|- | |- | ||
| | | 156 || tba || tba || [[Bild:DCS156.webp|x150px]] || Die böse Königin (Sammel-Motiv 7) | ||
|- | |- | ||
| | | 157 || tba || tba || [[Bild:DCS157.webp|x150px]] || Die böse Königin (Sammel-Motiv 7) | ||
|- | |- | ||
| | | 158 || tba || tba || [[Bild:DCS158.webp|x150px]] || Die böse Königin (Sammel-Motiv 7) | ||
|- | |- | ||
| | | 159 || tba || tba || [[Bild:DCS159.webp|x150px]] || Gaston (Sammel-Motiv 7) | ||
|- | |- | ||
| | | 160 || tba || tba || [[Bild:DCS160.webp|x150px]] || Gaston (Sammel-Motiv 7) | ||
|- | |- | ||
| | | 161 || tba || tba || [[Bild:DCS161.webp|x150px]] || Cruella (Sammel-Motiv 7) | ||
|- | |- | ||
| | | 162 || tba || tba || [[Bild:DCS162.webp|x150px]] || Rahmen (Sammel-Motiv 8) | ||
|- | |- | ||
| | | 163 || tba || tba || [[Bild:DCS163.webp|x150px]] || Rahmen (Sammel-Motiv 7) | ||
|- | |- | ||
| | | 164 || tba || tba || [[Bild:DCS164.webp|x150px]] || Rahmen (Sammel-Motiv 7) | ||
|- | |- | ||
| | | 165 || tba || tba || [[Bild:DCS165.webp|x150px]] || Rahmen (Sammel-Motiv 7) | ||
|- | |- | ||
| | | 166 || tba || tba || [[Bild:DCS166.webp|x150px]] || Alles-steht-Kopf-Trio (Sammel-Motiv 8) | ||
|- | |- | ||
| | | 167 || tba || tba || [[Bild:DCS167.webp|x150px]] || Alles-steht-Kopf-Trio (Sammel-Motiv 8) | ||
|- | |- | ||
| | | 168 || tba || tba || [[Bild:DCS168.webp|x150px]] || Alles-steht-Kopf-Trio (Sammel-Motiv 8) | ||
|- | |- | ||
| | | 169 || tba || tba || [[Bild:DCS169.webp|x150px]] || Russel (Sammel-Motiv 8) | ||
|- | |- | ||
| | | 170 || tba || tba || [[Bild:DCS170.jpg|x150px]] || Russel (Sammel-Motiv 8) | ||
|- | |- | ||
| | | 171 || tba || tba || [[Bild:DCS171.jpg|x150px]] || Wall-E (Sammel-Motiv 8) | ||
|- | |- | ||
| | | 172 || tba || tba || [[Bild:DCS172.jpg|x150px]] || Wall-E (Sammel-Motiv 8) | ||
|- | |- | ||
| | | 173 || tba || tba || [[Bild:DCS173.jpg|x150px]] || Miguel und Hector (Sammel-Motiv 8) | ||
|- | |- | ||
| | | 174 || tba || tba || [[Bild:DCS174.jpg|x150px]] || Miguel und Hector (Sammel-Motiv 8) | ||
|- | |- | ||
| | | 175 || tba || tba || [[Bild:DCS175.jpg|x150px]] || Miguel und Hector (Sammel-Motiv 8) | ||
|- | |- | ||
| | | 176 || tba || tba || [[Bild:DCS176.jpg|x150px]] || Mike und Sully (Sammel-Motiv 8) | ||
|- | |- | ||
| | | 177 || tba || tba || [[Bild:DCS177.jpg|x150px]] || Mike und Sully (Sammel-Motiv 8) | ||
|- | |- | ||
| | | 178 || tba || tba || [[Bild:DCS178.jpg|x150px]] || Remy (Sammel-Motiv 8) | ||
|- | |- | ||
| | | 179 || tba || tba || [[Bild:DCS179.jpg|x150px]] || Remy (Sammel-Motiv 8) | ||
|- | |- | ||
| | | 180 || tba || tba || [[Bild:DCS180.jpg|x150px]] || Buzz (Sammel-Motiv 8) | ||
|- | |- | ||
| | | 181 || tba || tba || [[Bild:DCS181.jpg|x150px]] || Buzz (Sammel-Motiv 8) | ||
|- | |- | ||
| | | 182 || tba || tba || [[Bild:DCS182.jpg|x150px]] || Nemo (Sammel-Motiv 8) | ||
|- | |- | ||
| | | 183 || tba || tba || [[Bild:DCS183.jpg|x150px]] || Nemo (Sammel-Motiv 8) | ||
|- | |- | ||
| | | 184 || tba || tba || [[Bild:DCS184.jpg|x150px]] || Woody (Sammel-Motiv 8) | ||
|- | |- | ||
| | | 185 || tba || tba || [[Bild:DCS185.jpg|x150px]] || Woody (Sammel-Motiv 8) | ||
|- | |- | ||
| | | 186 || tba || tba || [[Bild:DCS186.jpg|x150px]] || Woody (Sammel-Motiv 8) | ||
|- | |- | ||
| | | 187 || tba || tba || [[Bild:DCS187.jpg|x150px]] || Rahmen (Sammel-Motiv 9) | ||
|- | |- | ||
| | | 188 || tba || tba || [[Bild:DCS188.jpg|x150px]] || Rahmen (Sammel-Motiv 8) | ||
|- | |- | ||
| | | 189 || tba || tba || [[Bild:DCS189.jpg|x150px]] || Rahmen (Sammel-Motiv 8) | ||
|- | |- | ||
| | | 190 || tba || tba || [[Bild:DCS190.jpg|x150px]] || Rahmen (Sammel-Motiv 8) | ||
|- | |||
| 191 || tba || tba || [[Bild:DCS191.jpg|x150px]] || König-der-Löwen-Quartett (Sammel-Motiv 9) | |||
|- | |||
| 192 || tba || tba || [[Bild:DCS192.jpg|x150px]] || König-der-Löwen-Quartett (Sammel-Motiv 9) | |||
|- | |||
| 193 || tba || tba || [[Bild:DCS193.jpg|x150px]] || König-der-Löwen-Quartett (Sammel-Motiv 9) | |||
|- | |||
| 194 || tba || tba || [[Bild:DCS194.jpg|x150px]] || König-der-Löwen-Quartett (Sammel-Motiv 9) | |||
|- | |||
| 195 || tba || tba || [[Bild:DCS195.jpg|x150px]] || Pumbaa (Sammel-Motiv 9) | |||
|- | |||
| 196 || tba || tba || [[Bild:DCS196.jpg|x150px]] || Pumbaa (Sammel-Motiv 9) | |||
|- | |||
| 197 || tba || tba || [[Bild:DCS197.jpg|x150px]] || Pumbaa (Sammel-Motiv 9) | |||
|- | |||
| 198 || tba || tba || [[Bild:DCS198.jpg|x150px]] || Pumbaa (Sammel-Motiv 9) | |||
|- | |||
| 199 || tba || tba || [[Bild:DCS199.jpg|x150px]] || Timon (Sammel-Motiv 9) | |||
|- | |- | ||
| Zeile 322: | Zeile 423: | ||
==Sammel-Motive== | ==Sammel-Motive== | ||
Die ersten beiden Sammel-Motive werden in 23 Ausgaben vervollständigt, das dritte in 22 Ausgaben. Der Übergang zwischen zwei Sammel-Motiven ist etwas durcheinander: So kommt in Ausgabe 23 schon das erste Bild zum zweiten Sammelbild, obwohl das erste erst in Ausgabe 24 beendet wird. Diese "sanften Übergänge" dienen wahrscheinlich der Kundenbindung. | |||
Das erste Motiv ist das mittige des Sammelbilds, die Rahmen werden laut Anleitung als letztes gefertigt. | Das erste Motiv ist das mittige des Sammelbilds, die Rahmen werden laut Anleitung als letztes gefertigt. | ||
Auf Ausgabe 187 wird das neunte Sammelbild als das letzte bezeichnet, laut Website-Angaben endet dies in Ausgabe 220. | |||
<gallery perrow="5"> | <gallery perrow="5"> | ||
Aktuelle Version vom 19. Juni 2024, 14:57 Uhr

Die 115-teilige Magazin-Reihe Disney Kreuzstich erscheint seit Januar 2022 bei Hachette. Die erste Ausgabe wurde für einen Euro, die zweite für 3,50 Euro und alle folgenden für 5,99 Euro verkauft. Jede Ausgabe ist 16 Seiten dick, misst 285 x 220 mm und wird mit dem zu den Motiven passenden Stickgarn verkauft. Ab der dritten Ausgabe erscheint die Reihe wöchentlich.
Der Slogan der Reihe, welcher auf jeder Ausgabe zu lesen ist, lautet „Disneys zauberhafte Helden in Kreuzstich-Bildern“.
Zusätzlich zu den normalen Motiven gibt es alle zwei Ausgaben ein Stickmotiv, welches zusammen mit den folgenden Ausgaben ein großes, gemeinsames Motiv ergibt. In den ersten beiden Augaben war das zum Beispiel Tigger, bei Ausgabe drei und vier ist es der Elefant Dumbo.
Die Reihe entspricht der englischsprachigen Disney Cross Stitch.
Ausgaben[Bearbeiten | Quelltext bearbeiten]
| Ausgabe | deutsche Erstveröffentlichung | Bild (© Disney) |
Entspricht DCS (© Disney) |
Sammel-Motiv |
|---|---|---|---|---|
| 001 | 05.01.2022 |  |
 |
Tigger (Sammel-Motiv 1) |
| 002 | 26.01.2022 |  |
 |
Tigger (Sammel-Motiv 1) |
| 003 | 02.02.2022 |  |
 |
Dumbo (Sammel-Motiv 1) |
| 004 | 09.02.2022 |  |
 |
Dumbo (Sammel-Motiv 1) |
| 005 | 16.02.2022 |  |
 |
Mogli und Balu (Sammel-Motiv 1) |
| 006 | 23.02.2022 |  |
 |
Mogli und Balu (Sammel-Motiv 1) |
| 007 | 02.03.2022 |  |
 |
Klopfer (Sammel-Motiv 1) |
| 008 | 09.03.2022 |  |
 |
Klopfer (Sammel-Motiv 1) |
| 009 | 16.03.2022 |  |
 |
Winnie Puuh (Sammel-Motiv 1) |
| 010 | 23.03.2022 |  |
 |
Winnie Puuh (Sammel-Motiv 1) |
| 011 | 30.03.2022 |  |
 |
Pinocchio (Sammel-Motiv 1) |
| 012 | 06.04.2022 |  |
 |
Pinocchio (Sammel-Motiv 1) |
| 013 | 13.04.2022 |  |
 |
Bambi (Sammel-Motiv 1) |
| 014 | 20.04.2022 |  |
 |
Bambi (Sammel-Motiv 1) |
| 015 | 27.04.2022 |  |
 |
Patch (Sammel-Motiv 1) |
| 016 | 04.05.2022 |  |
 |
Patch (Sammel-Motiv 1) |
| 017 | 11.05.2022 |  |
 |
Susi und Strolch (Sammel-Motiv 1) |
| 018 | 18.05.2022 |  |
 |
Susi und Strolch (Sammel-Motiv 1) |
| 019 | 25.05.2022 |  |
 |
Susi und Strolch (Sammel-Motiv 1) |
| 020 | 01.06.2022 |  |
 |
Rahmen (Sammel-Motiv 1) |
| 021 | 08.06.2022 |  |
 |
Rahmen (Sammel-Motiv 1) |
| 022 | 15.06.2022 |  |
 |
Rahmen (Sammel-Motiv 1) |
| 023 | 22.06.2022 |  |
 |
Daisy (Sammel-Motiv 2) |
| 024 | 29.06.2022 |  |
 |
Rahmen (Sammel-Motiv 1) |
| 025 | 06.07.2022 |  |
 |
Daisy (Sammel-Motiv 2) |
| 026 | 13.07.2022 |  |
 |
Pluto (Sammel-Motiv 2) |
| 027 | 20.07.2022 |  |
 |
Pluto (Sammel-Motiv 2) |
| 028 | 27.07.2022 |  |
 |
Goofy (Sammel-Motiv 2) |
| 029 | 03.08.2022 |  |
 |
Goofy (Sammel-Motiv 2) |
| 030 | 10.08.2022 |  |
 |
Minnie (Sammel-Motiv 2) |
| 031 | 17.08.2022 |  |
 |
Minnie (Sammel-Motiv 2) |
| 032 | 24.08.2022 |  |
 |
Daisy und Donald (Sammel-Motiv 2) |
| 033 | 31.08.2022 |  |
 |
Daisy und Donald (Sammel-Motiv 2) |
| 034 | 07.09.2022 |  |
 |
Daisy und Donald (Sammel-Motiv 2) |
| 035 | 14.09.2022 |  |
 |
Micky (Sammel-Motiv 2) |
| 036 | 21.09.2022 |  |
 |
Micky (Sammel-Motiv 2) |
| 037 | 28.09.2022 |  |
 |
Tick, Trick und Track (Sammel-Motiv 2) |
| 038 | 05.10.2022 |  |
 |
Tick, Trick und Track (Sammel-Motiv 2) |
| 039 | 12.10.2022 |  |
 |
Tick, Trick und Track (Sammel-Motiv 2) |
| 040 | 19.10.2022 |  |
 |
Donald (Sammel-Motiv 2) |
| 041 | 26.10.2022 |  |
 |
Donald (Sammel-Motiv 2) |
| 042 | 02.11.2022 |  |
 |
Micky und Minnie (Sammel-Motiv 2) |
| 043 | 09.11.2022 |  |
 |
Micky und Minnie (Sammel-Motiv 2) |
| 044 | 16.11.2022 |  |
 |
Cinderella (Sammel-Motiv 3) |
| 045 | 23.11.2022 |  |
 |
Micky und Minnie (Sammel-Motiv 2) |
| 046 | 30.11.2022 |  |
 |
Cinderella (Sammel-Motiv 3) |
| 047 | 07.12.2022 |  |
 |
Rahmen (Sammel-Motiv 2) |
| 048 | 14.12.2022 |  |
 |
Merida (Sammel-Motiv 3) |
| 049 | 21.12.2022 |  |
 |
Rahmen (Sammel-Motiv 2) |
| 050 | 28.12.2022 |  |
 |
Merida (Sammel-Motiv 3) |
| 051 | 04.01.2023 |  |
 |
Merida (Sammel-Motiv 3) |
| 052 | 11.01.2023 |  |
 |
Arielle (Sammel-Motiv 3) |
| 053 | 18.01.2023 |  |
 |
Arielle (Sammel-Motiv 3) |
| 054 | 25.01.2023 |  |
 |
Tiana (Sammel-Motiv 3) |
| 055 | 01.02.2023 |  |
 |
Tiana (Sammel-Motiv 3) |
| 056 | 08.02.2023 |  |
 |
Jasmin (Sammel-Motiv 3) |
| 057 | 15.02.2023 |  |
 |
Jasmin (Sammel-Motiv 3) |
| 058 | 22.02.2023 |  |
 |
Rapunzel (Sammel-Motiv 3) |
| 059 | 01.03.2023 |  |
 |
Rapunzel (Sammel-Motiv 3) |
| Spezial | tba |  |
 |
/ |
| 060 | 08.03.2023 |  |
 |
Belle und Dornröschen (Sammel-Motiv 3) |
| 061 | 15.03.2023 |  |
 |
Belle und Dornröschen (Sammel-Motiv 3) |
| 062 | 22.03.2023 |  |
 |
Belle und Dornröschen (Sammel-Motiv 3) |
| 063 | 29.03.2023 |  |
 |
Pocahontas (Sammel-Motiv 3) |
| 064 | 05.04.2023 |  |
 |
Pocahontas (Sammel-Motiv 3) |
| 065 | 12.04.2023 |  |
 |
Schneewittchen (Sammel-Motiv 3) |
| 066 | 19.04.2023 |  |
 |
Alice (Sammel-Motiv 4) |
| 067 | 26.04.2023 |  |
 |
Schneewittchen (Sammel-Motiv 3) |
| 068 | 03.05.2023 |  |
 |
Alice (Sammel-Motiv 4) |
| 069 | 10.05.2023 |  |
 |
Rahmen (Sammel-Motiv 3) |
| 070 | 17.05.2023 |  |
 |
Aladdin (Sammel-Motiv 4) |
| 071 | 24.05.2023 |  |
 |
Rahmen (Sammel-Motiv 3) |
| 072 | 31.05.2023 |  |
 |
Aladdin (Sammel-Motiv 4) |
| 073 | 07.06.2023 |  |
 |
Käpt'n Hook (Sammel-Motiv 4) |
| 074 | 14.06.2023 |  |
 |
Käpt'n Hook (Sammel-Motiv 4) |
| 075 | 21.06.2023 |  |
 |
Ferkel (Sammel-Motiv 4) |
| 076 | 28.06.2023 |  |
 |
Ferkel (Sammel-Motiv 4) |
| 077 | 05.07.2023 |  |
 |
I-Aah (Sammel-Motiv 4) |
| 078 | 12.07.2023 |  |
 |
I-Aah (Sammel-Motiv 4) |
| 079 | 19.07.2023 |  |
 |
Nala und Simba (Sammel-Motiv 4) |
| 080 | 26.07.2023 |  |
 |
Nala und Simba (Sammel-Motiv 4) |
| 081 | 02.08.2023 |  |
 |
Nala und Simba (Sammel-Motiv 4) |
| 082 | 09.08.2023 |  |
 |
Peter Pan (Sammel-Motiv 4) |
| 083 | 16.08.2023 |  |
 |
Peter Pan (Sammel-Motiv 4) |
| 084 | 23.08.2023 |  |
 |
Tinkerbell (Sammel-Motiv 4) |
| 085 | 30.08.2023 |  |
 |
Tinkerbell (Sammel-Motiv 4) |
| 086 | 06.09.2023 |  |
 |
Tinkerbell (Sammel-Motiv 4) |
| 087 | 13.09.2023 |  |
 |
Rahmen (Sammel-Motiv 5) |
| 088 | 20.09.2023 |  |
 |
Rahmen (Sammel-Motiv 4) |
| 089 | 27.09.2023 |  |
 |
Rahmen (Sammel-Motiv 4) |
| 090 | 04.10.2023 |  |
 |
Rahmen (Sammel-Motiv 4) |
| 091 | 11.10.2023 |  |
 |
Eiskönigin-Quartett (Sammel-Motiv 5) |
| 092 | 18.10.2023 |  |
 |
Eiskönigin-Quartett (Sammel-Motiv 5) |
| 093 | 25.10.2023 |  |
 |
Eiskönigin-Quartett (Sammel-Motiv 5) |
| 094 | 01.11.2023 |  |
 |
Elsa (Sammel-Motiv 5) |
| 095 | 08.11.2023 |  |
 |
Elsa (Sammel-Motiv 5) |
| 096 | 15.11.2023 |  |
 |
Elsa (Sammel-Motiv 5) |
| 097 | 22.11.2023 |  |
 |
Olaf (Sammel-Motiv 5) |
| 098 | 29.11.2023 |  |
 |
Olaf (Sammel-Motiv 5) |
| 099 | 06.12.2023 |  |
 |
Arendelle (Sammel-Motiv 5) |
| 100 | 13.12.2023 |  |
 |
Arendelle (Sammel-Motiv 5) |
| 101 | 20.12.2023 |  |
 |
Troll (Sammel-Motiv 5) |
| 102 | 27.12.2023 |  |
 |
Troll (Sammel-Motiv 5) |
| 103 | 03.01.2024 |  |
 |
Anna (Sammel-Motiv 5) |
| 104 | 10.01.2024 |  |
 |
Anna (Sammel-Motiv 5) |
| 105 | 17.01.2024 |  |
 |
Anna (Sammel-Motiv 5) |
| 106 | 24.01.2024 |  |
 |
Christoph und Sven (Sammel-Motiv 5) |
| 107 | 31.01.2024 |  |
 |
Christoph und Sven (Sammel-Motiv 5) |
| 108 | 07.02.2024 |  |
 |
Christoph und Sven (Sammel-Motiv 5) |
| 109 | 14.02.2024 |  |
 |
Bruni (Sammel-Motiv 5) |
| 110 | 21.02.2024 |  |
 |
Bruni (Sammel-Motiv 5) |
| 111 | 28.02.2024 |  |
 |
Rahmen (Sammel-Motiv 6) |
| 112 | 06.03.2024 |  |
 |
Leutnant Destin Mattias (Sammel-Motiv 5) |
| 113 | 13.03.2024 |  |
 |
Rahmen (Sammel-Motiv 5) |
| 114 | 20.03.2024 |  |
 |
Rahmen (Sammel-Motiv 5) |
| 115 | 27.03.2024 |  |
 |
Rahmen (Sammel-Motiv 5) |
| 116 | 03.04.2024 |  |
 |
Winnie-Puuh-Quartett (Sammel-Motiv 6) |
| 117 | 10.04.2024 |  |
 |
Winnie-Puuh-Quartett (Sammel-Motiv 6) |
| 118 | 17.04.2024 |  |
 |
Winnie-Puuh-Quartett (Sammel-Motiv 6) |
| 119 | 24.04.2024 |  |
 |
Tigger (Sammel-Motiv 6) |
| 120 | 01.05.2024 |  |
 |
Tigger (Sammel-Motiv 6) |
| 121 | 08.05.2024 |  |
 |
Ru (Sammel-Motiv 6) |
| 122 | 15.05.2024 |  |
 |
Ru (Sammel-Motiv 6) |
| 123 | 22.05.2024 |  |
 |
I-Aah und Winnie Puuh (Sammel-Motiv 6) |
| 124 | 29.05.2024 |  |
 |
I-Aah und Winnie Puuh (Sammel-Motiv 6) |
| 125 | 05.06.2024 |  |
 |
I-Aah und Winnie Puuh (Sammel-Motiv 6) |
| 126 | 12.06.2024 |  |
 |
I-Aah und Winnie Puuh (Sammel-Motiv 6) |
| 127 | 19.06.2024 |  |
 |
Eule (Sammel-Motiv 6) |
| 128 | 26.06.2024 | |
 |
Eule (Sammel-Motiv 6) |
| 129 | 03.07.2024 |  |
 |
Rabbit (Sammel-Motiv 6) |
| 130 | 10.07.2024 |  |
 |
Rabbit (Sammel-Motiv 6) |
| 131 | 17.07.2024 |  |
 |
Rabbit (Sammel-Motiv 6) |
| 132 | tba | tba |  |
I-Aah (Sammel-Motiv 6) |
| 133 | tba | tba |  |
I-Aah (Sammel-Motiv 6) |
| 134 | tba | tba |  |
Ferkel (Sammel-Motiv 6) |
| 135 | tba | tba |  |
Ferkel (Sammel-Motiv 6) |
| 136 | tba | tba |  |
Winnie Puuh (Sammel-Motiv 6) |
| 137 | tba | tba |  |
Rahmen (Sammel-Motiv 7) |
| 138 | tba | tba |  |
Rahmen (Sammel-Motiv 6) |
| 139 | tba | tba |  |
Rahmen (Sammel-Motiv 6) |
| 140 | tba | tba |  |
Rahmen (Sammel-Motiv 6) |
| 141 | tba | tba |  |
Villains-Trio (Sammel-Motiv 7) |
| 142 | tba | tba |  |
Villains-Trio (Sammel-Motiv 7) |
| 143 | tba | tba |  |
Villains-Trio (Sammel-Motiv 7) |
| 144 | tba | tba |  |
Herzkönigin (Sammel-Motiv 7) |
| 145 | tba | tba |  |
Herzkönigin (Sammel-Motiv 7) |
| 146 | tba | tba |  |
Malefiz (Sammel-Motiv 7) |
| 147 | tba | tba |  |
Malefiz (Sammel-Motiv 7) |
| 148 | tba | tba |  |
Käpt'n Hook (Sammel-Motiv 7) |
| 149 | tba | tba |  |
Käpt'n Hook (Sammel-Motiv 7) |
| 150 | tba | tba |  |
Käpt'n Hook (Sammel-Motiv 7) |
| 151 | tba | tba |  |
Käpt'n Hook (Sammel-Motiv 7) |
| 152 | tba | tba |  |
Dschafar (Sammel-Motiv 7) |
| 153 | tba | tba |  |
Dschafar (Sammel-Motiv 7) |
| 154 | tba | tba |  |
Shir Khan (Sammel-Motiv 7) |
| 155 | tba | tba |  |
Shir Khan (Sammel-Motiv 7) |
| 156 | tba | tba |  |
Die böse Königin (Sammel-Motiv 7) |
| 157 | tba | tba |  |
Die böse Königin (Sammel-Motiv 7) |
| 158 | tba | tba |  |
Die böse Königin (Sammel-Motiv 7) |
| 159 | tba | tba |  |
Gaston (Sammel-Motiv 7) |
| 160 | tba | tba |  |
Gaston (Sammel-Motiv 7) |
| 161 | tba | tba |  |
Cruella (Sammel-Motiv 7) |
| 162 | tba | tba |  |
Rahmen (Sammel-Motiv 8) |
| 163 | tba | tba |  |
Rahmen (Sammel-Motiv 7) |
| 164 | tba | tba |  |
Rahmen (Sammel-Motiv 7) |
| 165 | tba | tba |  |
Rahmen (Sammel-Motiv 7) |
| 166 | tba | tba |  |
Alles-steht-Kopf-Trio (Sammel-Motiv 8) |
| 167 | tba | tba |  |
Alles-steht-Kopf-Trio (Sammel-Motiv 8) |
| 168 | tba | tba |  |
Alles-steht-Kopf-Trio (Sammel-Motiv 8) |
| 169 | tba | tba |  |
Russel (Sammel-Motiv 8) |
| 170 | tba | tba |  |
Russel (Sammel-Motiv 8) |
| 171 | tba | tba |  |
Wall-E (Sammel-Motiv 8) |
| 172 | tba | tba |  |
Wall-E (Sammel-Motiv 8) |
| 173 | tba | tba |  |
Miguel und Hector (Sammel-Motiv 8) |
| 174 | tba | tba |  |
Miguel und Hector (Sammel-Motiv 8) |
| 175 | tba | tba |  |
Miguel und Hector (Sammel-Motiv 8) |
| 176 | tba | tba |  |
Mike und Sully (Sammel-Motiv 8) |
| 177 | tba | tba |  |
Mike und Sully (Sammel-Motiv 8) |
| 178 | tba | tba |  |
Remy (Sammel-Motiv 8) |
| 179 | tba | tba |  |
Remy (Sammel-Motiv 8) |
| 180 | tba | tba |  |
Buzz (Sammel-Motiv 8) |
| 181 | tba | tba |  |
Buzz (Sammel-Motiv 8) |
| 182 | tba | tba |  |
Nemo (Sammel-Motiv 8) |
| 183 | tba | tba |  |
Nemo (Sammel-Motiv 8) |
| 184 | tba | tba |  |
Woody (Sammel-Motiv 8) |
| 185 | tba | tba |  |
Woody (Sammel-Motiv 8) |
| 186 | tba | tba |  |
Woody (Sammel-Motiv 8) |
| 187 | tba | tba |  |
Rahmen (Sammel-Motiv 9) |
| 188 | tba | tba |  |
Rahmen (Sammel-Motiv 8) |
| 189 | tba | tba |  |
Rahmen (Sammel-Motiv 8) |
| 190 | tba | tba |  |
Rahmen (Sammel-Motiv 8) |
| 191 | tba | tba |  |
König-der-Löwen-Quartett (Sammel-Motiv 9) |
| 192 | tba | tba |  |
König-der-Löwen-Quartett (Sammel-Motiv 9) |
| 193 | tba | tba |  |
König-der-Löwen-Quartett (Sammel-Motiv 9) |
| 194 | tba | tba |  |
König-der-Löwen-Quartett (Sammel-Motiv 9) |
| 195 | tba | tba |  |
Pumbaa (Sammel-Motiv 9) |
| 196 | tba | tba |  |
Pumbaa (Sammel-Motiv 9) |
| 197 | tba | tba |  |
Pumbaa (Sammel-Motiv 9) |
| 198 | tba | tba |  |
Pumbaa (Sammel-Motiv 9) |
| 199 | tba | tba |  |
Timon (Sammel-Motiv 9) |
| tba | tba | tba | tba | tba |
Sammel-Motive[Bearbeiten | Quelltext bearbeiten]
Die ersten beiden Sammel-Motive werden in 23 Ausgaben vervollständigt, das dritte in 22 Ausgaben. Der Übergang zwischen zwei Sammel-Motiven ist etwas durcheinander: So kommt in Ausgabe 23 schon das erste Bild zum zweiten Sammelbild, obwohl das erste erst in Ausgabe 24 beendet wird. Diese "sanften Übergänge" dienen wahrscheinlich der Kundenbindung.
Das erste Motiv ist das mittige des Sammelbilds, die Rahmen werden laut Anleitung als letztes gefertigt.
Auf Ausgabe 187 wird das neunte Sammelbild als das letzte bezeichnet, laut Website-Angaben endet dies in Ausgabe 220.
-
-
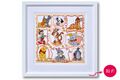
-
 Sammel-Motiv 3 mit Schneewittchen, Pocahontas, Belle, Dornröschen, Rapunzel, Cinderella, Merida, Jasmin, Tiana und Arielle
 -
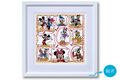
 Sammel-Motiv 4 mit Tinkerbell, Peter Pan, Simba, Nala, I-Aah, Alice, Aladdin, Ferkel und Käpt'n Hook
 -
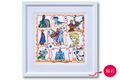 Sammel-Motiv 5 mit Leutnant Destin Mattias, Bruni, Christoph, Sven, Anna, Elsa, einem Troll, Arendelle und Olaf


